We love reading old model railroad magazines. They’re loaded with stories of how this person made this and that person made that. Folks were creative, making due with what could be found, and turning it into fabulous models. I remember a magazine cover photo from the 70’s showing an amazing black wrought iron looking bridge built entirely of paper and cardstock. Wow!
Building structures out of paper is not as common today. There are an abundance of plastic and laser cut wood kits available. Assembly tends to be fairly quick. But then comes time to paint where we must do our best and try to make our model look real. Many people love to paint and can produce stunning results. For those who don’t, I want to introduce you to paper modeling, because paper models are basically already painted.
Building structures out of printed paper is quite popular in Europe but has fallen out of favor here in the United States. There are several manufacturers producing excellent models in the U.K. and Europe, but only a few in our country. However as new designers come along our choices for western style models is improving.
There are three advantages to downloadable paper models. They’re inexpensive, immediately accessible, and are “pre-painted.” Made of photographs and quality illustrations, these models typically look great the moment the final piece is installed. With no cost of packaging, injection molding, laser cutting or shipping, paper models cost a tiny fraction of boxed or bagged models.
You can shop at anytime from anywhere you have internet access, download and start building your next great scene. Most companies offer free “example” models so you can experience their quality and modeling with paper. For scratchbuilders paper model companies offer huge arrays of pre-finished pages of wood, brick and metal siding, roofing, stone walls, paving and more.
Modeling with paper may not be for everyone. The construction process can take longer than plastic models and have more parts to assemble, but you save time by not needing to paint. Parts can be small, glue can be messy and some folks just don’t think they can cut a straight line. But like any other skill, the more you practice the more your speed and quality will improve.

What You Need to Make Paper Models
As with any type of modeling you will need certain basic tools and supplies [4]. These are few and inexpensive, and available at most stores with office supply, craft or hobby departments. Most modelers will already have most or all of these around their work area. Here’s our recommended list of basic tools:
- Scissors
- Hobby knife
- Extra strength glue stick glue
- White (PVA) glue
- Metal edge ruler, preferably with cork backing
- Smartphone, tablet, computer, or borrow a friend’s
- Paper, poster board and mat board
Optional but helpful:
- Color printer – See article “No Printer? No Problem.”
- Tweezers
Some of Our Favorite Specialty Tools
As you progress in modeling with paper and cardstock you may wish to expand your tool selection. We each have some favorite tools to speed up construction or do it more precisely. None of these are necessary and we would recommend waiting to acquire them until you find the need.
A Cutting Mat: Self-healing cutting mats are a wonder. The surface allows you to make clean cuts even through the thinnest paper, helps preserve the sharpness of your cutting blade, and protects the surface of your table underneath. An excellent choice are the models from US Art Supply. While we like the smaller 12×18 inch size, you might prefer either the 9×12 or 24×36 size. You can find them on Amazon: 12×18, 9×12, 24×36.
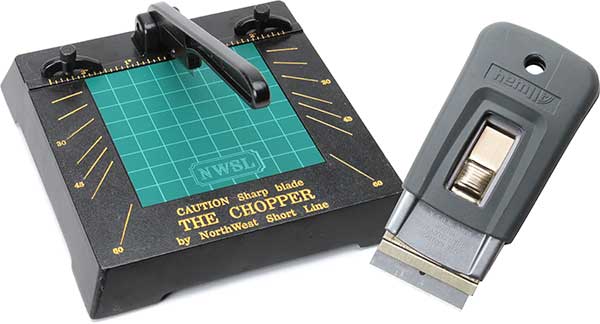
The Chopper by NorthWest Short Line: For making slender, small or repetitive cuts of mat board you can’t beat The Chopper. Although expensive in comparison to basic tools this can be a real time saver. An inexpensive alternative: a simple razor glass scraper from the hardware store. Some of the advantages at a tiny fraction of the cost.
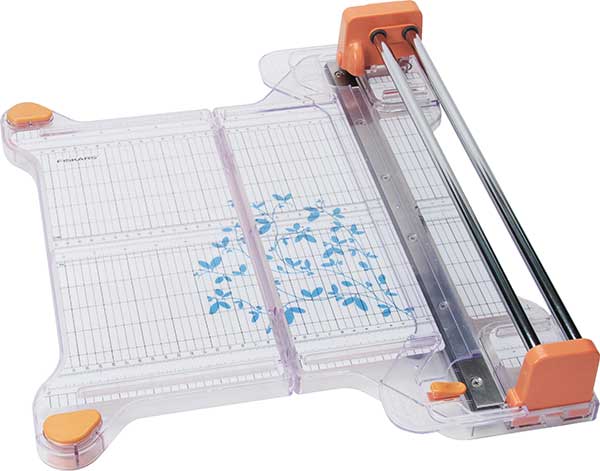
A rotary paper cutter: We like this deluxe version from Fiskars (model 100580-1002) but even an inexpensive model will assist you in making long straight paper cuts. It can cut card stock as heavy as mat board and the blade is self-sharpening. Here’s a link to this model on Amazon.
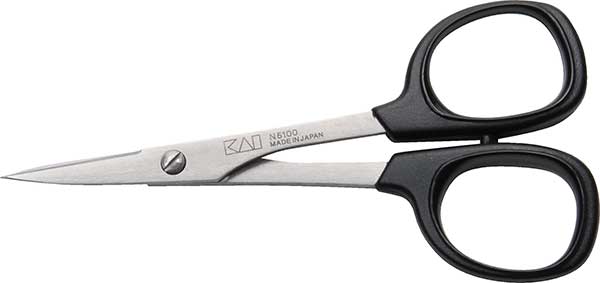
Mini scissors: I use a pair of somewhat expensive Kai Japanese-made sewing snips that excel at small cuts and trimming edges. We work primarily in N-scale and these are great for detail work. Look for a thin blade that will hold an edge. Thick blades will tend to curl the paper and cardstock as you cut. Here’s a link to the Kai scissors on Amazon.
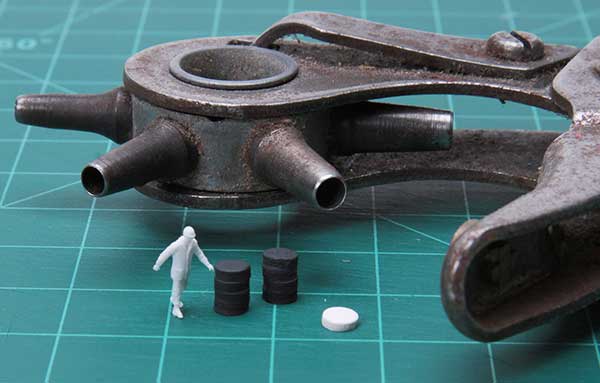
Rotary punch: This doesn’t get used very often but is practically indispensable if you need to make small diameter circles in mat or poster board. We specified its use in making round industrial roof vents for instance. Hint: the 4mm punch is perfect for making N-scale barrels! 4 punches of mat board glued together and painted with a felt pen or paint makes a quick 24″ diameter by 36″ tall standard metal drum. Here’s a link to a good rotary punch on Amazon.
Basic Steps to Building a Paper Model
Since this article is an overview of modeling with paper we’re not going to show each step in building a specific model. Instead we’re going to show you the basic process so you know what to expect. Your model will typically come with its own set of detailed instructions.
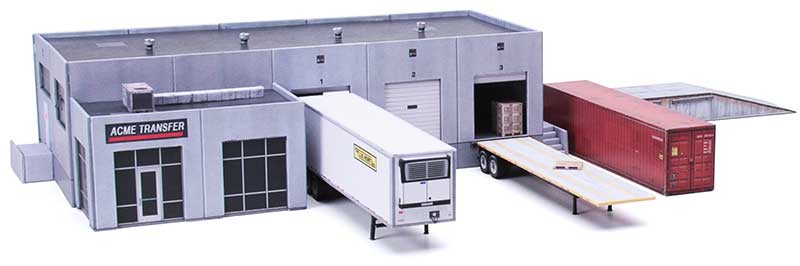
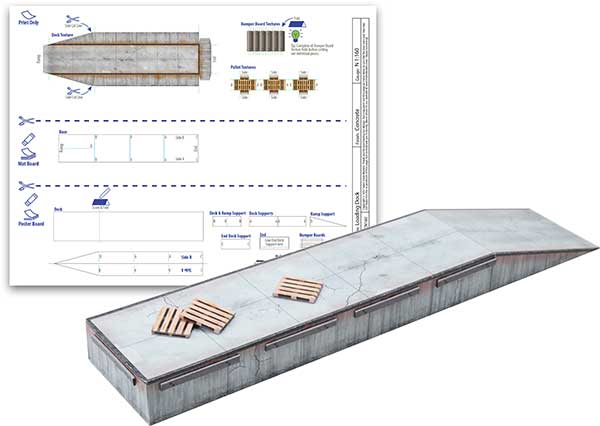
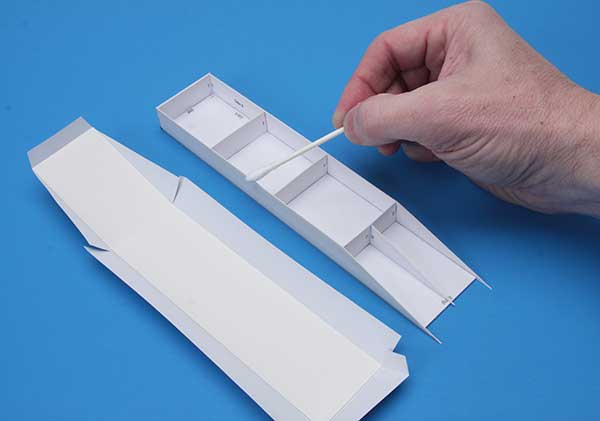
To build a paper model you will download the model files, print out the pages and assemble. Assembly starts with gluing some of the model pages or parts to heavier cardstock such as poster and mat board for rigidity. These are then cut out and glued together, forming a finished model. Here’s the basic steps to build a simple paper loading dock model shown above, our free model for you to sample.
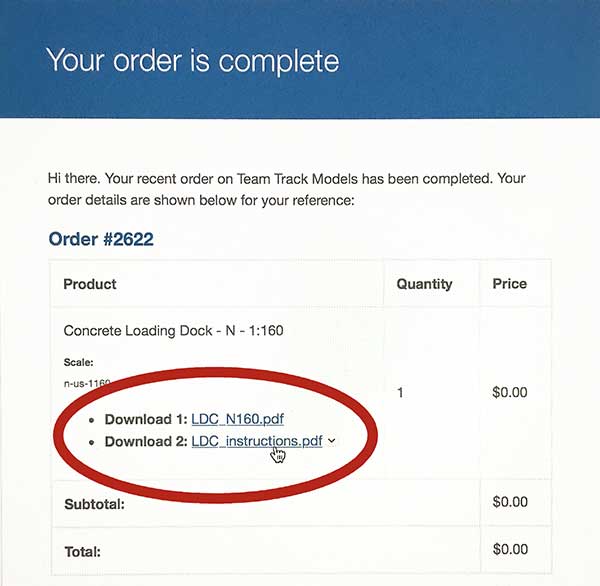
To begin you need to download the files. Typically, you will have a link provided either by email or on the paper model company website after you make your purchase. Clicking the link will allow you to download and save the model files. If storage space is limited such as on a mobile phone or tablet, I recommend having a Dropbox or Google Drive account for download storage. They are free, reliable, and accessible from any computer or device.
The next step is to print the model pages and if desired the instructions. Color laser printers and copiers have good color dynamics and are waterproof but the finish is somewhat glossy. In general, we recommend laser printed pages for their durability and bold color. Inkjet printers can be less vibrant on regular paper but don’t “shine” with reflected light. If you print using inkjet it can be a good idea to give your pages a coat of dull clear spray to give some protection to the print.
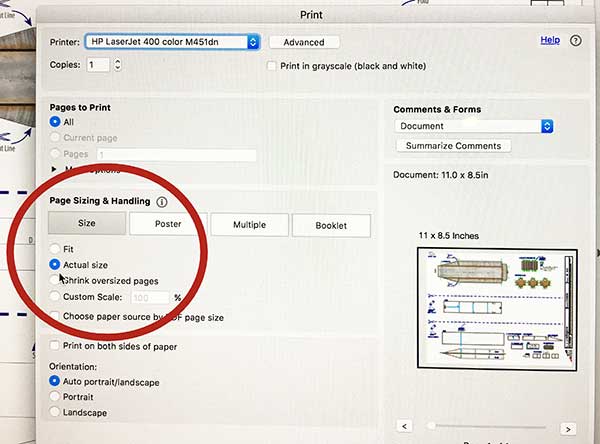
Print the pages needed with scale set to none. This preserves the original scale of the model.
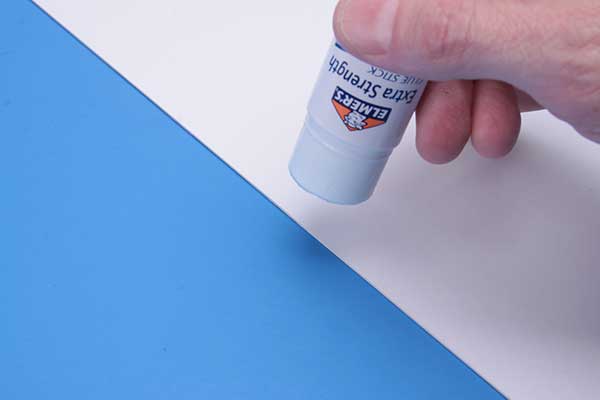
Some parts or pages need to be glued to thicker cardstock before cutting out while some are glued after as per the model instructions. When gluing paper to heavier stock, apply the glue to the poster or mat board and then press the paper to the board. We have found that applying the glue directly to the paper can cause the paper to stretch resulting is pieces that don’t fit or assemble properly. A rolling pin (called a brayer) can be useful to get all the bubbles out from underneath the paper and give a better finish.
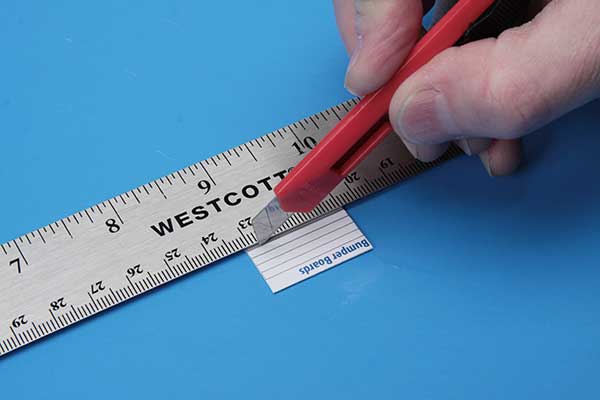
The most time-consuming aspect of paper modeling is cutting out the parts. Care in cutting results in smoother lines, better piece fitting and a better overall model upon completion. The advantage of paper models over plastic or wood is that mistakes are easily and inexpensively replaced. Paper can be cut with good scissors but cardstock parts need careful cutting with a hobby knife. One of the best knives we’ve found is the cheap dollar store snap-blade knife. They can be found for as low as three for a dollar, have 10 or so blades in each knife, are sharp and sturdy, and last longer than pointier hobby knives. Replace your blades frequently as mat and poster board will dull them very quickly.
The assembly stage brings your model to life. Follow the model’s instructions. They were written during the design/build process and will help prevent errors and mistakes. Some models have pictograms to show how the pieces go together. Apply glue sparingly, a little goes a long way and allow drying time between steps. While simple models can be built in an hour or two, complex models can require many evenings.
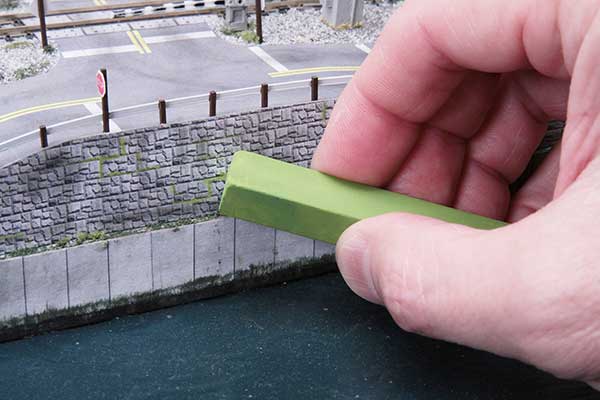
Some structures include light to heavy weathering depending on the effect the designer intended, but you can add additional weathering to your structures with colored pencils and pastels. Go lightly at first and keep adding detail until you’ve reached the desired effect. A coat of dull clear finish can seal in your work if desired.
And that’s it. That’s the basic process for completing a paper structure for your model railroad layout.
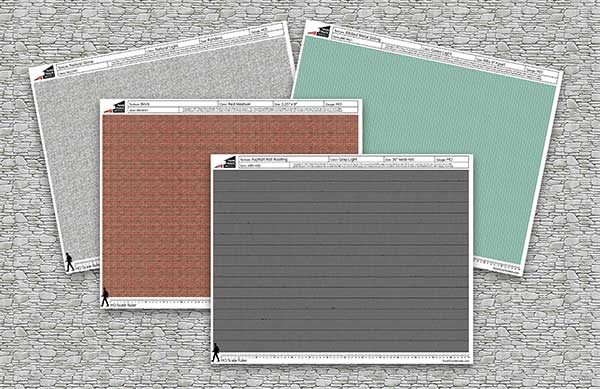
Paper Textures for Scratchbuilders
Most of the companies that have building and structures also have large selections of printable textures and finishes including roofings, sidings, floorings and more. Inexpensive printable textures can be a gold mine of finishes for the scratch builder. Regardless of the base building material, whether it is cardstock, styrene or wood, printed textures can be an excellent method of finishing a model without the difficulty of paint.
Note About CA Allergies
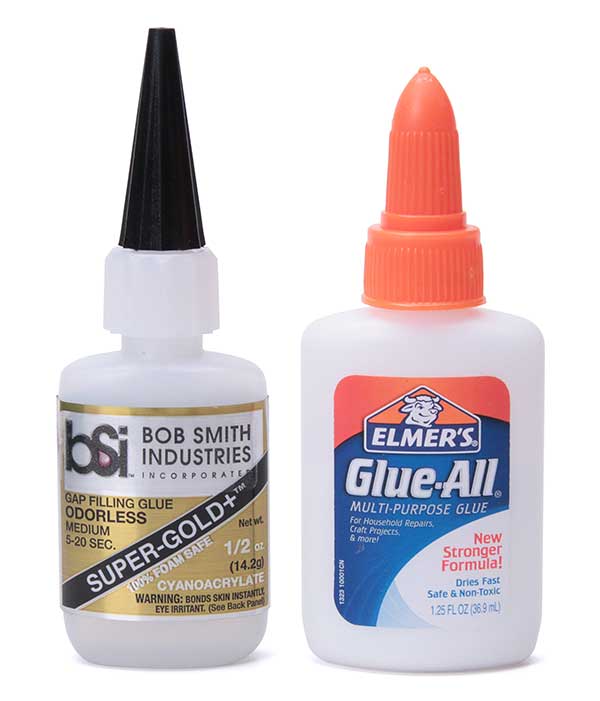
Cyanoacrylate glue (superglue or CA) is one of a modeler’s favorite glues. It bonds many materials and does it quick and strong. When we first began building our paper models naturally we used CA. Last spring, I started having severe colds. I’d be ill for several days, start to get better for a couple days and then get sick again. This went on for months, including an expensive trip to the doctor and an unsuccessful round of antibiotics, without finding a cure.
I began to wonder if the glue could be the cause, and with a little research I found that a small portion of folks are allergic to CA. The severe cold-like symptoms onset about 12 hours after exposure and last about 3 days. Bingo, that was it! I stopped using CA and after a few days I was well.
We decided that if CA can make people really sick, perhaps we should look for an alternative. To the rescue is good old PVA (such as Elmer’s Glue All). For paper modeling PVA has an excellent bond, reasonably sets in only about twice the seconds as CA, and allows for a little adjustment. I’ve grown to like using PVA more than CA for the most part when constructing paper models. Research suggested that medical grade CA (which is also safe for gluing foam) might not cause a reaction, and it seems to not cause me any ill side-effects.
We sometimes link to products offered by other vendors to help you locate items we don’t carry in house. Some of these are may earn us a small commission, but at no extra cost to you, if you choose to make a purchase. As always, we appreciate your patronage.